Ingredients
3 cups rice cereal Light, crunchy base
3 cups plain oat cereal Hearty texture, mild flavor
3 cups slightly crushed pretzel sticks Salty contrast, crunch
3 cups colorful candy Visual appeal, sweet bursts
2 cups salted peanuts Protein, rich flavor, crunch
16 ounces white chocolate Sweet coating, binding agent
2 tablespoons neutral oil such as coconut or avocado oil Helps chocolate melt smoothly
Instructions
1-First Step: Preparation and Measuring Before you begin mixing, take a moment to prepare your workspace and measure all ingredients precisely. This crucial first step ensures balanced flavors and prevents last-minute scrambling. Clear a large counter space, and get out a very large mixing bowl, a microwave-safe bowl for melting the chocolate, a spoon for stirring, and a baking sheet lined with parchment paper. Having everything measured and ready before you start will make the process smoother and more enjoyable. The total prep time is approximately 10 minutes, but having ingredients pre-measured can make it even faster. This mise en place approach is especially helpful if you’re cooking with children, as it minimizes potential mess and confusion.
2-Second Step: Combining Dry Ingredients In your large mixing bowl, combine the 3 cups of rice cereal, 3 cups of plain oat cereal, 3 cups of slightly crushed pretzel sticks, 3 cups of colorful candy pieces, and 2 cups of salted peanuts. Mix these ingredients gently but thoroughly to ensure an even distribution throughout the bowl. When crushing the pretzel sticks, aim for pieces about half their original size. This increases the surface area for the white chocolate to adhere to while maintaining enough structure to provide a satisfying crunch. Be gentle when mixing to avoid crushing the cereals or breaking the candies too much. You want a variety of textures in the final mix, so maintaining some whole pieces is important.
3-Third Step: Melting the White Chocolate In a microwave-safe bowl, combine the 16 ounces of white chocolate with the 2 tablespoons of neutral oil. The oil is essential here, as it helps the white chocolate melt smoothly and creates a better coating consistency. Microwave the mixture in 30-second intervals, stirring thoroughly after each interval. This gradual melting process is crucial for achieving smooth, glossy white chocolate without seizing or burning. White chocolate is particularly sensitive to heat and can easily become grainy or seize if overheated. Stirring between intervals helps distribute the heat evenly and prevents hot spots. Depending on your microwave’s power, this process should take 2-3 intervals, but keep a close eye on it. Pro tip: If you don’t have a microwave, you can melt the white chocolate and oil using a double boiler on the stovetop. Just place the chocolate mixture in a heat-proof bowl over a pot of simmering water, stirring constantly until smooth.
4-Fourth Step: Coating the Mix Once your white chocolate is completely smooth and melted, pour it evenly over the dry ingredients in your large bowl. Using a large spoon or silicone spatula, gently fold the mixture, coating all pieces evenly. This step requires a light touch to avoid crushing the cereals while ensuring everything gets covered in chocolate. Work methodically, lifting ingredients from the bottom and folding them over the top. Continue until no dry spots remain and all pieces have a white chocolate coating. This process typically takes 2-3 minutes of gentle but thorough mixing. The mixture will become somewhat sticky as the chocolate begins to cool slightly, so work efficiently but carefully.
5-Fifth Step: Spreading and Chilling Transfer the coated mixture onto your parchment paper-lined baking sheet. Spread it in an even layer, breaking up any large clumps but allowing some small clusters to remain. These clusters add to the charm and texture of the finished Reindeer Chow. Place the baking sheet in the refrigerator for at least 30 minutes to allow the white chocolate to set completely. This chilling time is crucial for achieving the perfect crunch. Without proper cooling, the chocolate will remain soft and the mixture won’t hold together well. If you’re in a rush, you can place the tray in the freezer for 15-20 minutes instead.
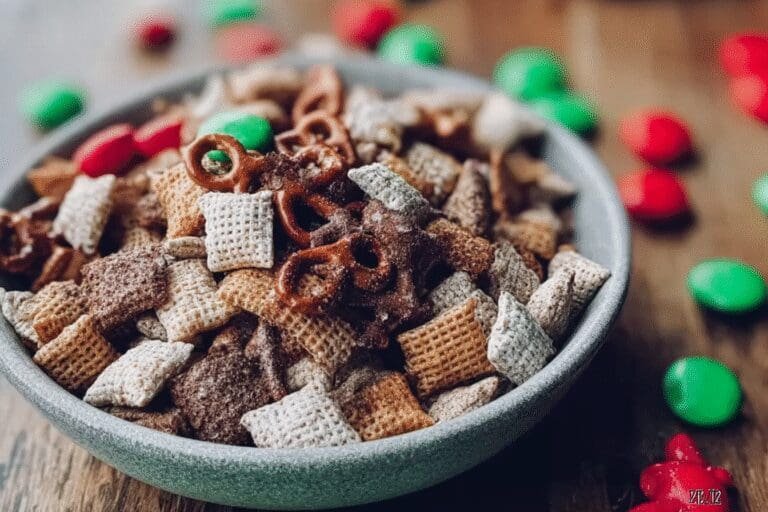
6-Final Step: Breaking and Serving Once chilled and the white chocolate has hardened, remove the Reindeer Chow from the refrigerator. Break the mixture into bite-sized chunks using your hands. The mixture should separate easily, with some clusters remaining for visual appeal and texture variety. Transfer the broken pieces to an airtight container or serve immediately in a festive bowl. Reindeer Chow makes an excellent addition to holiday tables, and its colorful appearance is sure to draw compliments from guests. This recipe yields approximately 16 servings, making it perfect for sharing. If you made any dietary substitutions, such as using vegan white chocolate or gluten-free cereals, this final step remains the same. The process works equally well with alternative ingredients, ensuring everyone can enjoy this delicious treat regardless of dietary restrictions.
Last Step:
Please leave a rating and comment letting us know how you liked this recipe! This helps our business to thrive and continue providing free, high-quality recipes for you.Notes
❄️ Use neutral oil like coconut or avocado to achieve a smooth chocolate coating.
🍬 Customize the mix by substituting cereals or candies to cater to allergies or preferences.
🧊 Refrigerate promptly to ensure the chocolate sets evenly for easy handling.
- Prep Time: 10 minutes
- Chilling Time: 30 minutes
- Cook Time: 0 minutes
- Category: Snack, Dessert
- Method: Mixing, Melting, Chilling
- Cuisine: American
Nutrition
- Serving Size: About 1 cup